Thursday, October 29, 2015

Give Thanks!


Hello, friends!  I know we are just 2 days away from Halloween, but I wanted to share a fun technique and a Thanksgiving card to get you in the giving mood--that's really what all holidays are about, right?! :)  I used some gorgeous stamps from the Red Rubber Designs store and a fun technique I'll share with you...take a peek...


I went with a very neutral color scheme on this card.  I started by stamping the acorn images from the Give Thanks set in dark brown ink as a border all the way around a piece of kraft cardstock.


To create the blurred vision feel on these images, here's what I did:

  1. Stamped the images in a dark ink onto lighter cardstock.
  2. Took a water color pen and outlined each image.
EASY, PEASY!!!  It helps to use a water soluble ink and not a permanent ink when utilizing this technique.  You also want to make sure it's not an after thought--you really need to outline the images as soon as you are done stamping them.  It takes a bit of time, but I LOVE the vintage feel this technique lends to any image OR sentiment...


To make sure the sentiment could POP off the card, I first added some gold washi behind it.  This also added some shine. :)  A few gold sequins were added, and then I placed the completed panel onto a card base that was prepped with some paper from the Catelynne collection.  LOVE the gorgeous distressed feel of that paper with the blurred vision technique on the images!


Thank you so much for popping by today, friends!  That is all for me right now, but I will be back soon with more inspiration using gorgeous products from the Red Rubber Designs store!  Until then, HUGS and happy stamping, friends!

blog sig 2015-16 photo Signature_1.png

Project supplies:

Thursday, October 22, 2015

Ginger Joy

Hello!  Angie here!  We are nearing the end of October which means we need to build our stash of winter cards. Red Rubber Designs has a wide variety of winter stamps to help you create one of a kind treasures for friends and family.  To check out the winter/Christmas line click HERE.

I seem to be all about jewel tones for winter this year!  I colored the adorable Ginger Joy ginger cookie in shades of violet and popped him on a tag.  The tag is on sticky foam so it can be taken off and used by the recipient. 


I hope today's card has inspired you to have fun and create something for your winter list!  Thanks so much for stopping by!

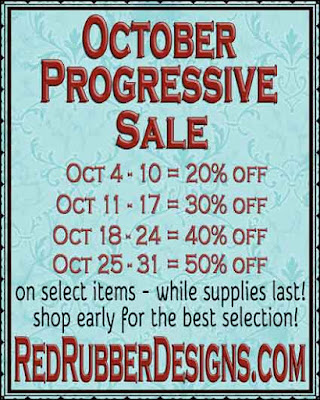
Be sure to visit  Red Rubber Designs store and grab some goodies at fabulous prices during the October Progressive Sale!  This week select items are 40% off while supplies last!


Thursday, October 15, 2015

Fantastic Fall Tag Tutorial

     I hope you're all having a fantastic Fall so far!! I know I am, with Fall being my favorite time of year! I just love when the leaves change colors, and tried to mimic the wind blowing them around on this tag that I made using some fabulous stamps from Red Rubber Designs!


          Start with a tag cut from white cardstock. Mine was cut at 5 1/2" with my Cricut Expression using the Plantin Schoolbook cartridge. With a blending tool, color your tag from top to bottom using Distress Inks (Peacock Feathers, Seedless Preserves, and Spiced Marmalade).


     Stamp trees onto the tag, lightly stamping in some places, to create more depth, like I did here using the Tree Silhouettes stamp.


     Lightly spray the leaf pattern stamp from Autumn Leaves with water, and stamp all over the tag.


     Before adding the fence and ribbon, stamp the pumpkin directly onto your tag on the bottom right, using the Pumpkins and Acorns stamp, to avoid fussy cutting the little swirls. Stamp again onto white cardstock,  and color it in, (I used watercolor pencils and Distress Inks for the leaves). Cut your pumpkin out and glue over the first image you stamped, adding another layer of cut leaves to it.

On top of the tag I stamped Fantastic Fall using the Autumn Swirls stamp, which also has other Fall sentiments you can choose from instead. To really give it a windy feel, I scattered some fussy cut leaves that I made with the Autumn Leaves border, coloring them with Distress Inks. I finished it up by distressing and stitching the edges with my sewing machine, adding fibers to the top.


     Thanks for your visit, and be sure to stop by the Red Rubber Designs store for the fantastic fall sale going on right now!  

******************************


Thursday, October 8, 2015

There's A Twinkle

Hi there,

Welcome to Red Rubber Inspirations!

Barb here to share a Christmas tag that I put on a card today. Have you started your Christmas cards yet? The stamp I used is called Twinkle In The Eye found Here and the sentiment is from Glorious Holiday found Here.


I stamped Twinkle In The Eye in blue ink and added glitter embossing powder in blues and white on different areas and the rest in clear. Then I cut Twinkle In The Eye into a tag shape. I colored a few areas with my Copics.

There are lots of other fabulous stamps in the Winter/Christmas category found Here. So what are you waiting for? Go check out these stamps in the SHOP and get busy creating some Christmas cards!


Stamps used for this card:

Join us right back here next week to see what the Inspiration Team is up to!

Happy Stamping!

Monday, October 5, 2015

October Progressive Sale - Going On NOW!

Don't miss the biggest sale of the year at Red Rubber Designs!


October Progressive Sale at Red Rubber Designs

Sale includes many already-discounted items!

Includes unmounted rubber stamps and crafty supplies!

Shop early for the best selection!

Discounts calculate in your shopping cart

Good while supplies last!

Thursday, October 1, 2015

What a Hoot!


Hello, friends!  It's Mynn here again with another card using some FABULOUS stamps from the Red Rubber Designs store!  Today I'm going to share a quick and easy Halloween card with a fun technique to get your creative juices flowing.  First, check out the completed card...


Isn't that fun?!  I used some patterned paper from the Just Like Dad stack and then the Be Scary set for my image and sentiment.  Guess what?  They are BOTH stamped on vellum!  Yep, I stamped the image on vellum, even if it doesn't quite look like it.  Here's a close up...


Isn't the texture behind the image awesome?  Here's how to create this effect with this darling owl:

  1. Stamp your image onto a piece of vellum.  Wait for it to dry, or dry with a heat tool.
  2. Punch or die cut your image to the desired shape.
  3. Turn the image to where the stamping is FACE DOWN.  Color in your image ON THE BACK of the vellum.  This helps to make sure your image doesn't smear!
  4. Wait for marker to dry, or heat briefly with heat gun.
  5. Using a glue runner, add glue to the back of your shaped image. 
  6. Add the image to a piece of cardstock slightly larger than your vellum.
I think the texture from the adhesive helps add to the spookiness of the owl.  If you don't like to see adhesive behind your vellum, you could attach your vellum like I did with the sentiment--staples!


There are other ways to attache vellum to cards, too.  Brads, foam tabs hidden under embellishments or stamping/embossing, and so many others!  What is your favorite way to add vellum to your projects?  I'd love to have a conversation about it in the comments below! :)


Thank you so much for stopping by today, friends!  I hope you take some time to play around with vellum today--and don't forget to go grab the Be Scary set that I used from the online store!  Until next time, HUGS and SPOOKY stamping, all! :)

blog sig 2015-16 photo Signature_1.png

Project supplies: