Tuesday, June 26, 2012

Tutorial Tuesday: Natalee Accordion Album Kit

The Natalee Accordion Album Kit is a beautiful printed, cut, and scored kit to help you quickly make a beautiful keepsake or fun album to give for a gift.  The hardest part of making this album will be choosing which side of the gorgeous papers to use.


 Contents of Kit
1 accordion album
2 pockets
4 tall pockets w/slant opening
4 tags
1 belly band

Supplies needed for assembly
bone folder
small scissors or sanding block
ink or marker of choice
adhesive of choice - directions are using Scor-Tape
Option:  Angelee Patterned Cardstock Collection
Natalee and Angelee Ribbon

After removing all of the die cuts from the excess paper you will notice little nubs where the dies were attached. These can be easily removed with small sharp scissors or a sanding block. All pieces are pre-scored for easy assembly. (See next step before folding.)  Decide which side of the pockets and frames that you want to use, fold on the scores with a bone folder to get a crisp fold.

 
If you want to stamp on any of the components, do so before folding while the pieces are still flat.
Now the hard part comes. Lay out the prepared pieces and decide where you want to put them. You can work on both sides of the album.  There is no right or wrong here, whatever is pleasing to you.
Inking is strictly optional and can be done at any time during the assembly process.  I like to cover the white core of the cardstock on my projects so I ink my edges and folds. This can be accomplished in three different ways.  Direct to paper - using your ink pad to apply the ink directly to the paper.  Foam applicator - apply ink to a foam applicator and then to the paper. Or Marker - run the sided of the marker surface along the edge of the paper - note: this method does not work well on folds.

Assembling the picture frames
Step 1 - Place frame face down and apply adhesive all the way around the opening in the frame - I used 1/4" tape.
Step 2 - Place photo or picture on your work surface. After removing waste paper from tape, position frame over photo and press to adhere.
Step 3 - Turn frame with photo over to back side. Apply adhesive next to folds or on tabs. Here I used 1/2" tape next to the folds.
Step 4 - Remove tape backing and fold over tabs to secure.

Assembling the pockets
Apply adhesive to the side pre-folded flaps of the pockets. I used 1/2" tape. By taping the 2 sides first, the tape will hold down the bottom flap to make adding tape to it easier.


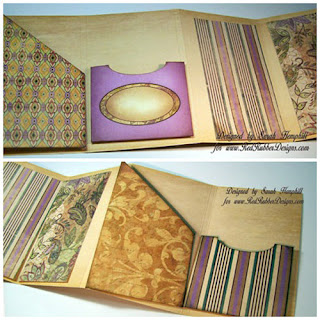
Now that you have all of your pockets and frames inked and taped and ready to go, you are ready to fold your album.  It is pre-scored to make folding easy.  The double score line allows plenty of room in each section of the album to handle the bulk of pockets and embellishments. Your album should look like this if you have chosen the floral print side for your cover. You have the option of the solid side for your cover by folding in the reverse of what you see in the picture.
Check your layout again before you stick everything down to make sure everything is where you want it.

Here is my album ready for pictures and embellishments.
The kit also includes a belly band as an option for keeping your album securely closed. You can adorn it however you wish.  I chose a ribbon and tag for mine.
The PDF version of this tutorial is available as a free download in the Red Rubber Designs store.

Red Rubber Designs products used in this tutorial:
Natalee Accordion Album Kit
Angelee Patterned Cardstock Collection
Angelee and Natalee Ribbon
Kai Gold 4" Scissors
Vintage Background Rubber Stamp Set
Background Soup Rubber Stamp Set
Beautiful Soul Rubber Stamp Set
Beauty of a Woman Background Rubber Stamp


Sunday, June 24, 2012

Week in Review - June 24, 2012

Welcome to this week's Week in Review at Red Rubber Designs!

Starting this week, our Week in Review on our blog is a bit shorter than usual as we're transitioning the bulk of the information over to our new weekly newsletter. Sign up by clicking on the link in our sidebar. You'll get notification of sales, new items and stamps added to our store and special sales just for our newsletter subscribers.

It is HOT HOT HOT in Alabama so why not have a sale that matches? We have over 200 items on sale at 20% off their already-low prices. Hardware, patterned paper, cardstock, album kits, chipboard albums, paper punches and more! Sale ends July 4, so don't wait to pick up your favorites!

Did you hear? Red Rubber Designs now has its own Flickr group. Join us and show off all of your creations using Red Rubber Designs' stamps. Flickr is free to join. Starting in July, every third Thursday we'll have a fun challenge with prizes, so come on over and join the fun!

The Design Team has been busy this past week:

* The Scrap Yard (Kate Yetter) - Art Journal
* Cream City Angels (Debra Miller) - Scrapbook Page with Journal Pocket Tutorial
* Distracted by Something Shiny (KC Eddy) - Scrapbook Page
* Creative Stamping with Paula-Kay (Paula-Kay Bourland) - Acrylic & Chipboard Album
* Vintage Figments (Sarah Hemphill) - Chipboard Mini Album
* Kard Krazy (Louise Granlund) - Acrylic & Chipboard Album

Want to know what else is going on (and get a little treat for signing up)? Subscribe to our Newsletter and get it directly in your email inbox!

Thursday, June 21, 2012

Introducing the Red Rubber Designs Flickr Group!

We now have a Flickr Group that is open to everyone so that you can post all of your wonderful projects created with Red Rubber Designs stamps! And starting in July, every third Thursday we'll have a fun challenge with prizes.
Come on over and join us and show us your art!


Additional details:

You'll need to join Flickr to participate in our group - it's free!

The photos you submit to the group won't show up until they're approved. And, only those photos that feature rubber stamped images from the Red Rubber Designs store will be approved.

Tuesday, June 19, 2012

Tutorial Tuesday: The Pemberley Bay Matchbook Kit

Today, I would like to share with you how to assemble just one of the beautiful, easy to follow kits from Red Rubber Designs. The Pemberley Bay Matchbook Kit is full of vintage prints in lovely turquoise, creams and greens. This is easily one of my favorites from the Red Rubber Designs Store.


Tools Needed:

Pemberley Bay Matchbook Kit
Distress Inks
Distressing Tool
Crop-A-Dile Tool
Juliette Hardware (copper eyelets)
Reece and Woodrowe Ribbon

(All of the linked items above are on sale this month in the Red Rubber Designs store, along with 150+ more items!)

Assembly Directions:

1. You will need to detach the matchbook cover and pages from the kit. Extra embellishments are included but not needed for the assembly. Everything comes pre-cut and pre-scored.


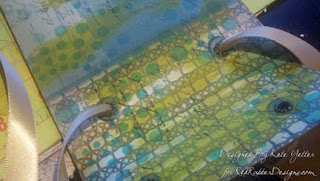
2.  I started out by distressing the edges of my pages to achieve a vintage look. Use the paper distress tool or the edges of sharp scissors and drag it along the edges of all your pages. Next, ink your edges with distress ink or any sepia-colored ink. (Palette Cognac works well for this step, too.)


My pages look like this after distressing the edges:


3. Decorate the inside and outside of your cover with flat mediums such as inks, stamps, sprays or paints.


4. Insert eyelets into the four holes of the cover which will bind the pages. Remember to place the eyelets so the outsides are on the cover.


5. Flip the cover over so the wrong sides of the eyelet are facing up. Thread ribbon through the two bottom holes only.


6. Thread ribbon through the decorated pages:  Close the flap over the pages and thread the ribbon through the remaining two holes. Tie a bow.


7. Decorate the front of your assembled Matchbook Kit and enjoy!


The Pemberley Bay Matchbook Kit has lots of fun embellishments to decorate your assembled mini-album, too. You can find a FREE PDF version of this tutorial in the Red Rubber Designs store.

Thank you for visiting!


Sunday, June 17, 2012

Week in Review - June 17, 2012


Happy Father's Day to all the Dad's out there!

Thank you to everyone who joined in our First Thursday hop and played along with our scavenger hunt! Rebecca Hughey is the winner of a free Spotlight Stamp set! Congratulations, Rebecca!

Do you have a Crop-A-Dile Big Bite - or do you need one? - and aren't sure how to use it? Debra has created a step-by-step tutorial on the Big Bite and how to use it. She also did a video to go with it. If you haven't seen it yet, go take a look and dust off your Big Bite because you'll want to use it after your see this! Don't have one yet? They're on sale this month at Red Rubber Designs! (Discount shows up in your shopping cart.)

You can always download a free PDF of any of our tutorials in the Red Rubber Designs store.

Remember that June = Scrapbooking here at Red Rubber Designs! Scrapping of all kinds: Scrapbook layouts, mini albums, art journals, smash books, creating your own embellishments, anything and everything to do with preserving memories - and all using stamps from Red Rubber Designs!

We have over 150 items on sale at 20% their already-low prices. Anything and everything you need for your own scrapbooks, art journals and more! Try our quick and easy mini-album kits and you'll have the perfect memento or gift in no time. And yes, they're on sale, too - along with all of our patterned paper!

And to thank you for supporting Red Rubber Designs, I'm putting an extra free gift in every order over $50 (not including shipping): an exclusive leather photo album with The Angel Company logo on the front.

This handsome album (retail value $15.95) has stitched, padded leather covers and holds 36 - 4" x 6" photos. Inside there are clear protective pages with liners to protect your photos.

You don't have to do anything to get it except purchase $50 worth of products (after discounts) and you'll receive one with your order!

Some good news for you:  I've re-looked at our shipping prices and reduced them. Now shipping is only $5.95. And for orders $75 and over, it's free! Currently we do only ship to the U.S. and APO's, but I'm looking into exanding that to international as well. If you live outside of the United States, check back with us - I hope to be shipping to you soon!

Have you seen the Design Team Projects for the week? They're showing off some fabulous ideas, so go check them out:

Cream City Angels (Debra Miller)
Wordbirds Nest (Diana Queen)
The Scrap Yard (Kate Yetter)
Creative Stamping with Paula-Kay (Paula-Kay Bourland)
Distracted by Something Shiny (KC Eddy)
Kard Krazy (Louise Granlund)
Vintage Figments (Sarah Hemphill)

New items added to the store recently:

New Bazzill cardstock, handmade crocheted flowers and some fun grab bags!

New stamps added to the store last week:

Running Stitches
Simple Starters

Have you been to our Facebook page lately? LIKE us and don't miss anything - it’s a great way to get advance notice on sales and other fun events!

Coming up next week:

Another Tutorial Tuesday with Kate - don't miss it!
Even more scrappy goodness by our fabulous Design Team!
And a fun announcement - stay tuned!

Tuesday, June 12, 2012

Tutorial Tuesday: The Big Bite


Today is Tutorial Tuesday and I have a tutorial for a tool - the Crop-A-Dile II Big Bite.  The picture above is the Big Bite in its case {case sold separately}.

Both the original Crop-A-Dile and Big Bite punch through paper, chipboard, thin metal, plastic, fabric and leather with ease.

The difference between the original Crop-A-Dile and the Big Bite is the depth you can set an eyelet.  The hole punches on the original Crop-A-Dile are limited to 1" from the edge of the page, great for small projects.  

With the Crop-A-Dile II {Big Bite} you can set an eyelet up to 6 inches in from the edge of your paper - so that means you can place an eyelet, grommet or snap anywhere on a 12" x 12" scrapbook page. 

You can also minimize the bulkiness of your scrapbook page by adding the eyelet directly to the base page, rather than layering.

Here are some of the features:

There are 3 options for the selector switch
 Set
 1/8" diameter hole
3/16" diameter hole
  
There are 3 rulers {or depth gauges} one for each setting - the 3/16" diameter hole, setting and 1/8" diameter hole.  In the picture above, the stop set for 3 inches on the "3/16 hole" gauge. 
With the selector switch set at 3/16, I place my cardstock in the Big Bite, bottom out on the stop set at 3 inches and press down on the handle.  A 3/16" diameter hole is punched 3 inches from the edge of my page.

To set the eyelet, I need to change my settings.
 
Slide the selector switch to set
 Position the stop at 3 inches on the center gauge labelled "setting".  
 Pull down and rotate the upper guide to "A" 
Pull up and rotate the lower crimp to "1"

Put the eyelet in the hole previously punched in the paper and place it in the jaws, bottoming out on the stop.  Line up the upper guide with the center of the eyelet and press down on the handle. 
Now you have a crimped eyelet 3 inches in from the edge of the page.
I've created an even more in-depth and printable tutorial which is available in the tutorial section of Red Rubber Designs.  It is a FREE download.

Also, during our special Scrapbook Month at Red Rubber Designs, the Crop-A-Dile Big Bite is on sale! Get it at 20% it's already-low price! (Discount show up in shopping cart.)

There is also a 4 minute video on the Red Rubber Designs YouTube Channel, shown below, if you would like to see the Big Bite in action! 


Hope you enjoyed today's tutorial.
Deb

Monday, June 11, 2012

Scavenger Hunt Winner!

We hope you enjoyed our blog hop featuring the new stamp releases for June and the incredible scrapbook layouts presented by the Design Team. We also had a fun scavenger hunt and one lucky winner. Before I announce the winner, here are the questions from the hunt and their answers:

  1. There are 35 Palette reinkers. How many share part of their name with a flower?  Answer: Seven (7) Gelle ROSE, French LILAC, IRIS, LAVENDER Sachet, SUNFLOWER, VIOLETE, WATER LILY
  2. How many free tutorials are listed?  Answer:  Nine (9)
  3. On the main page, what picture is listed for TAC swag?  Answer:  (Cha Cha) mug
  4. Of the 6 mini album kits, which one is the brightest color?  Answer:  Rockin' Roxie
  5. Under "Specials" how much is the lowest priced item?  Answer:  $2.45
  6. How many stamp sets are in the Spotlight?  Answer:   One (1)
  7. What is your favorite RRD stamp?  Answer:  Any set listed in the store counts as a correct answer.
And now the winner of this month's Spotlight stamp set Happily Grateful is......

Rebecca Hughey


Congratulations, Rebecca! I know you will enjoy creating with your new stamps from Red Rubber Designs.


Sunday, June 10, 2012

Week in Review: June 10, 2012

Welcome to the Red Rubber Designs Week in Review! Each week, time permitting, we'll review the prior week of activity so you don't miss anything!

First this week: Don't miss our Scavenger HuntFollow the Blog Hop and play along - contest ends Sunday, June 10th at midnight (US-CT) (that's tonight!). Your successful hunt enters you in a drawing where one random winner will receive a FREE Spotlight Stamp!

For our Tuesday Tutorial, we had a sneak preview of the month to come with Paula-Kay's wonderful tutorial that shows us how to easily and quickly put together our Rockin' Roxie Matchbook Album Kit Everything in our mini-album kits is ready to go for you - just add embellishments, some stamping and your pictures! Then, she goes on to show us how she decorated her matchbook album. It's adorable!


This past week, we officially started the month of June here at Red Rubber Designs with our First Thursday Blog Hop! (Click here to read a little more about what our First Thursdays are all about.) We decided that June = Scrapbooking! Scrapping of all kinds: Scrapbook layouts, mini albums, art journals, smash books, creating your own embellishments, anything and everything to do with preserving memories - and all using stamps from Red Rubber Designs! Never stamped in your scrapbooks before? We'll show you how!

Also for the month of June: We can't talk about scrapbooking without talking about a sale, can we? No, we can't! From June 7 - Wednesday, July 4 (First Thursday of June through First Thursday of July) we have over 150 items on sale at 20% off their already-low prices! Anything and everything you need for your own scrapbooks, art journals and more! Try our quick and easy mini-album kits and you'll have the perfect memento or gift in no time! And yes, they're on sale, too - along with all of our patterned paper!

But that's not all! To thank you for supporting Red Rubber Designs, I'm putting an extra free gift in every order over $50 (not including shipping): an exclusive leather photo album with The Angel Company logo on the front!
This handsome album has stitched, padded leather covers and holds 36 - 4" x 6" photos. Inside there are clear protective pages with liners to protect your photos.

You don't have to do anything to get it except purchase $50 worth of products (after discounts) and you'll receive one with your order! 

The Design Team has been busy this week! Besides the First Thursday Blog Hop, they have some new projects on their blogs:


New products added to the store:


New stamps added to the store:


Don’t forget to LIKE our Facebook page! It’s a great way to get advance notice on sales and other fun events!


Coming up next week:

Debra has a fabulous tutorial for Tuesday that shows you how to add lots of fun to your scrapbooks!

More scrappy goodness by our wonderful Design Team! Stay tuned!

Thursday, June 7, 2012

First Thursday: New Releases and June Blog Hop

Happy First Thursday!

A new month means New Releases at Red Rubber Designs!  June is all about scrapbooking at RRD, all month the design team will be posting new ideas - like scrapbook layouts, mini albums, art journals, embellishments - all using the newly released June stamp sets.  Oh and don't forget about Tutorial Tuesdays, you won't want to miss those.  Free downloadable tutorials and maybe even a video tutorial this month.    

Are you ready for some Scrapbook Inspiration and Special Sale items?

We are going kick off this month of scrapbook ideas with a Design Team Blog Hop.  Each DT member created a scrapbook page using the June spotlight stamp set "Happily Grateful".  I know I can't wait to see what everyone did with this set!

Happily Grateful

Just to make a bit more interesting, we are having another contest.  Ready to go on a Scavenger Hunt??  

Contest Details:  Each member of the design team has a different question about the Red Rubber Designs in their blog post.  All the answers can be found in the RRD Store.  So as you hop, leave a lovely comment and collect the question at each stop, then head over to the RRD Store and find the answers.

Once you find all 7 answers to the questions, email the list of answers to contest@RedRubberDesigns.com with your name and e-mail address.  If you answered correctly, your name will be entered into a drawing for our June spotlight stamp set "Happily Grateful" - one winner will be randomly chosen.

Contest ends Sunday, June 10th at midnight (US-CT)
  
Each stop on our hop will also have a picture of a newly released stamp set.  This is Gratitude to God:

Gratitude to God

Here is the Blog Hop Order:

Good Luck and Happy Hopping!

Tuesday, June 5, 2012

Tutorial Tuesday: Rockin' Roxie Matchbook Kit

Here is a "sneak peek" by Paula-Kay of just one of the fun and creative ideas to come during our Scrapbook month, starting this First Thursday at Red Rubber Designs!
###

The Rockin' Roxie Matchbook Kit by Red Rubber Designs is double sided patterned cardstock with lots of pieces to complete an entire mini photo album.


Here are two views, showing both sides of the kit.


Begin by punching out all the pieces in the kit.  Since they are double sided, you can choose in which order and on which side you lay them before assembling the album.


The pieces are pre-scored, and holes are already punched.  Go ahead and fold all the scored lines and punch the holes out.  Then arrange the album pages as you desire.


 Some great complements to the Rockin' Roxie Matchbook Kit are the Miss Moxie Patterned Cardstock Collection with tags, the Miss Moxie ribbons, and Miss Moxie hardware.  They can be used perfectly in this project. 


I began by adding some of the large orange eyelets from the Miss Moxie
hardware to the cover of my album. I used a Pink Crop-a-Dile to set the eyelets.


 Then I chose the orange organza ribbon from the Miss Moxie ribbons to tie my
   album together.


 Now the matchbook album is assembled and 
ready to add photos and embellishments.  


The first thing I added was tabs to each page.  This adds variety to the pages, makes it easy to turn them, and can also be used for journaling.

 
The following pictures are the inside pages of my finished album after
adding all my photos, embellishments and journaling.
My album is a horse birthday party that two of my granddaughters 
shared last year on their 6th and 7th birthdays.

This is the way the album looks when first opened.  Since there are seven double-sided pages and the back page, that made 15 pages on which to add photos.

Page 1 has picture of their horse cake. Around the photo I used extra fine clear glitter to cover the brackets.  The tab is labeled by hand with a journaling pen.


These are the next pages in the album.  Notice that I have used Miss Moxie hardware and ribbons, tags and photo corners from the kit as well as tags from the Miss Moxie Patterned Cardstock Collection.

Pages 2 and 3

Pages 4 and 5

Pages 6 and 7

 Pages 8 and 9

Pages 10 and 11

Pages 12 and 13

Page 14  

Page 15

Lastly, I finished my cover page using birthday sayings from Red Rubber Designs Sophisticated Sentiments stamped on patterned cardstock from the Miss Moxie Collection on Spellbinders Labels 10 Nestabilities and Lacey Ovals.  Sticker jewels finished the embellishments.  The ink I used was Noir Palette Ink.